QuerySurge Agents perform the actual query tasks by QuerySurge. Agents execute queries against Source and Target data stores, and return the results to QuerySurge. As you start your QuerySurge projects, and grow and mature them, installing and upgrading Agents are a standard part of the process. This article discusses how to add and upgrade Agents deployed on Linux.
QuerySurge Agent Installation Location
Agents should be installed on wire-connected platforms on the same network as your QuerySurge App server. Installing Agents on machines that might be connected via WiFi or by VPN will not only send potentially large amounts of data over a narrow connection but may also expose data on an insecure connection. Additionally, network topology, especially over VPN, may slow or interfere with the connection.
Agent Installation
- Install a QuerySurge Agent using the QuerySurge Installer.
 Note: the Agent version must match the QuerySurge App Server version. Therefore, you must use the same installer/version to install Agents as you used to install the QuerySurge App Server.
 - You may install multiple QuerySurge Agents up to the number that your license permits.
- Each QuerySurge Agent deployed in your environment needs at least one JDBC driver to work with your data sources. A JDBC driver is a piece of software that allows your Agent to "talk" to a data source. So, for example, if you plan to use QuerySurge with Oracle and Teradata, you will need to deploy both the Oracle and the Teradata drivers to each Agent.
- The QuerySurge Installer comes bundled with JDBC drivers for several industry-standard databases, and you can install these drivers when you install the Agent. You can always add new drivers using the installer after you have installed an Agent.
- Your JDBC driver may not be bundled with QuerySurge; if not, you can deploy your JDBC driver(s) manually to the Agent machine. For more information, see Adding JDBC Drivers below.
- Note that the QuerySurge Agent installs as a service.Note: The Agent Service will have the default Operating System permissions of the user under
whose login the Agent was installed. By default, this login is the Windows Local System account, which gives the Agent local administrator rights (approximately). Note that the default Local System account most likely will not have permissions to domain resources, which can affect Agent access to such resources. So, for example, if you plan to use your Agent to query flat files on network shared drives, you will likely have to set additional permissions for the Agent Service to allow the Agent to access the shares. See Changing Agent Service Permissions for Network Resources
For a more detailed article on Agent installation please see the Agent Installation Guide for Linux article.
The QuerySurge Agent as a Service
The QuerySurge Agent is installed as a service. This means that:
- The Agent will start automatically when its' deployment platform is rebooted.
- The Agent runs regardless of whether any user is logged in or not.
- The Agent Service will have the default Operating System permissions of the user under whose login the Agent was installed.
- Note that the Service account for the Agent most likely will not have permissions to domain resources, which can affect Agent access to such resources. So, for example, if you plan to use your Agent to query flat files on network shared drives, you will likely have to set additional permissions for the Agent Service to allow the Agent to access the shares.
Adding JDBC Drivers
Users can "manually" add JDBC drivers to Agents at any time. Details for this process can be found in the following Knowledge Base article:
Registering an Agent with QuerySurge
QuerySurge Agent Auto-Registration
The QuerySurge Agent will "auto-register" itself with QuerySurge. When you install a QuerySurge Agent, the installer will ask you for the URL of your QuerySurge installation. The installer will then install and start the Agent. When the Agent first starts, it will check its registration status with QuerySurge, and it will auto-register if necessary. QuerySurge must be installed an running for this process, of course.
Note: The QuerySurge Installer will only ask you for the QuerySurge URL if you are installing the Agent on a different box than you are installing the QuerySurge App Server on.
As a security measure, once your Agent has auto-registered, a QuerySurge Global Administrator must log into the QuerySurge Global Administration Portal and Enable the newly registered Agent, by clicking on the checkbox in the Enabled column for that Agent. This means that the Agent is registered with QuerySurge; it does not mean that the Agent is assigned to, or Enabled on a QuerySurge Project. See the article Assigning and Enabling Agents in Projects for more details.
Registering an Agent Manually
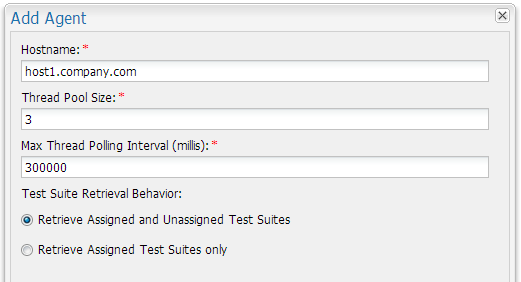
In some cases, QuerySurge may require you to manually register an Agent. This is a security measure, occurs when an Agent has previously existed in your QuerySurge instance, and has been deleted. To perform a manual Agent registration, login and navigate to the Global Administrative Portal, and choose the Agent node in the tree. Click on the Add button to launch the Add Agent dialog. To obtain the Agent Hostname, run the hostname command at the Linux command line. Check this name against the output in the Agent log once you have started the Agent. You can paste this into the Hostname field in the Add Agent dialog. No connection between the Agent and the QuerySurge server is required for this copy/paste setup step.
Core Registration Settings
Core registration settings are set by the Global QuerySurge Administrator when an Agent is registered with QuerySurge:
-
Thread Pool Size - the total number of threads the Agent can use to execute queries. The optimal number will depend on the resources available to your Agent platform. Three (3) threads is a reasonable number to start experimenting with.
Note: As rough benchmark figures, we regularly use 3 threads on 2 GB RAM Agent deployments, and 5 threads on boxes with 4 GB or greater.Note: There is a tradeoff between launching a larger number of query threads vs. the cpu and memory resources required to service those threads while they are executing. At a certain point, more threads can start to slow the Agent down, and increasing the number of threads will eventually lead to lower throughput, not higher. Because Agent performance has Operating System and hardware dependencies, a bit of experimentation in your environment is worthwhile. -
Maximum Thread Polling Interval - The maximum interval the QuerySurge Agent will wait to poll QuerySurge for query instructions in milliseconds.
Note: Default value for this setting is 300000 ms (5 min). - Test Suite Retrieval Behavior - This governs QuerySurge Agent behavior regarding retrieval of Suites. The first option lets the Agent pick up any Suites whether specifically assigned to that Agent or not; the second option forces the Agent to retrieve only Suites specifically assigned to that Agent.
Configuring a QuerySurge Agent
Configuration Options
QuerySurge Agents have multiple configuration options that can affect how your Agents behave. You can configure your Agents via the QuerySurge Global Administration Portal or by modifying the agentconfig.xml file in the config/ subdirectory for any Agent, using a text editor:
QuerySurge Agents have multiple configuration options that can affect how your Agents behave. You can configure your Agents by modifying the agentconfig.xml file in the config/ subdirectory for any Agent, using a text editor:
- Edit your agentconfig.xml file carefully.
- Always stop your Agent process before starting to edit the config file (see below for commands).
- When you modify this file, always make a backup copy of the file before editing; any improper syntax may cause your Agent to be nonfunctional.
Core Configuration
The agentconfig.xml file is found in: \\<QuerySurge Install Dir>\QuerySurge\agent\config
Stop your Agent process before editing with the following command:
>> service QuerySurge stop agentAfter editing is complete and the agentconfig.xml file is saved, start your Agent with:
>> service QuerySurge start agentStart the Agent configuration process by checking the QuerySurge URL. In many cases, the Agent has been configured with the URL during installation; if it has not, you will have to configure it manually. The URL format is:
<qsserverurl>http://<server>:<port>/QuerySurge/services/QuerySurge</qsserverurl>Advanced Configuration
The following configuration options are available via the QuerySurge Global Administraion Portal:
- Query Thread Pool Size
- Max Thread Polling Interval
- Test Suite Retrieval Behavior
- Listen for Special Tasks
- Agent Message Size
- Agent Fetch Size
- Agent Heap Size
- Agent Debug Level
- Max Analysis Polling Interval
- Max Connect Retries
- Max Request Retries
- Request Retry Delay
- Outer Polling Loop Wait
The following key configuration options are found in agentconfig.xml:
- Listen for Special Tasks
- Agent Message Size
- Agent Fetch Size
- Agent Heap Size
Listen for Special Tasks
<listenForSpecialTasks>Y</listenForSpecialTasks>This setting controls whether the Agent listens for tasks such as Connection Test tasks. The purpose of this setting is to let you 'turn off' certain tasks once they are completed - for example, once your Connections are set up, you won't need all your Agents checking whether any Connection Tests need to be performed. Turing these task requests off cuts down on unnecessary network traffic.
Agent Message Size
<agentMemoryMode>lim=3</agentMemoryMode>This setting gives you control over the maximum message size (in MB) that is sent from the Agent to QuerySurge. The Agent Message Size can have values of 'nolim' or numeric values. By default, the Agent Message Size is set to 3 MB. Selecting the 'nolim' option tells the Agent to use the maximum size allowed, which is a bit under 50 MB. Depending on the memory resources available on your Agent platform, you may want to experiment with message sizes smaller than the maximum. Using smaller message sizes will cause the Agent to send its data in a larger number of smaller messages, saving Agent memory at the expense of a larger number of messages (=> greater network traffic).
Note: This setting plays a significant role in Agent heap memory consumption. This, in turn, affects the maximum size Resultset that your Agent can handle with the memory that is available to it.
Agent Fetch Size
<fetchHint>1000</fetchHint>This setting allows you to set the JDBC fetch size, in ResultSet rows. According to the JDBC documentation, the fetch size is "the number of rows that should be fetched from the database when more rows are needed for this ResultSet." Selecting 'No Limit' lets the driver make its own choice about how many rows to fetch. Note that according to the JDBC specification, this is only a hint, and driver vendors are permitted to implement this feature at their own discretion, and need not implement it at all. Consult your JDBC driver documentation to see the specifics of how your drivers implement the JDBC fetch size.
Agent Heap Size
<heap>1000</heap>This sets the maximum amount of memory that can be allocated to the Java heap, in MB. This is a critical parameter, since it governs the heap that the Agent has access to during query execution and processing.
Note: A significant factor in Agent heap memory consumption is how your JDBC driver manages memory. This, in turn, affects the maximum size Resultset that your Agent can handle with the memory that is available to it. There can be significant variation in JDBC drivers here, so it is wise to perfom trials with your driver to see how the Agents behave on the machines you have deployed them on.
There are a couple of important caveats for setting this value:
- Heap size can only be set at launch, so if you choose a new value, you will receive notification that the Agent must be stopped and re-launched.
-
The heap size setting refers to contiguous memory. If your system does not have the amount of memory requested as contiguous memory, the Agent process will immediately exit.
Note: If, on Agent launch, the Agent quits and the log file contains the following error: "Error occurred during initialization of VM. Could not reserve enough space for object heap", then the Operating System could not give the JVM the heap size it requested. To set the heap size request lower so that your Agent will launch, you must edit (use any text editor) the Agent config file (/../config/agentconfig.xml); set the<heap>tag value to a lower value than it is currently set at (1000 MB is the default; this works on most systems), save the file, and re-launch the Agent.Note: If your system is only able to support heap sizes in the hundreds of MB, then the Resultset sizes that your Agent can handle are likely to be relatively small.Note: The Agent Message Size, Agent Fetch Size and Agent Heap Size all interact to shape the size of the queries that your Agent can manage. The QuerySurge Agent installs with default values that are optimized for a generic set of queries; these optimizations are a starting point for work with your queries. Tuning these values using a set of your standard queries is suggested.
This setting controls the debug information output to the Agent log. See the Run a QuerySurge Agent in Debug Mode article for more information.
Max Analysis Polling Interval
This setting controls the maximum polling interval (in seconds) for checking the analysis status.
Max Connect Retries
This setting controls the maximum number of attempts to reconnect in case of a connection failure.
Max Request Retries
This setting indicates the maximum number of retries for a request if it fails initially.
Request Retry Delay
This setting controls the delay (in seconds) between consecutive request retries.
Outer Polling Loop Wait
This setting defines the number of seconds to wait between checking for new executions.
The QuerySurge Agent and HTTPS/SSL
See this Knowledge Base article for details about HTTPS/SSL setups for QuerySurge components.
Agents and Projects
After the Agent installation and configuration procedure described in this article, there are two additional key steps that you need to execute to make your Agents available for use:
- the Agent must be registered with QuerySurge and Globally Enabled with QuerySurge
- the Agent must be assigned to a Project and Enabled in that Project
Both of these steps are discussed in detail in this Knowledge Base article: Assigning and Enabling Agents in Projects.
Agent Troubleshooting
Troubleshooting issues are discussed in this Knowledge Base article: Troubleshooting QuerySurge Agent Issues
Upgrading Agents
Agents are upgraded using the standard QuerySurge upgrade procedure: a newer QuerySurge installer (i.e. a later version than your current installation) must be deployed to each Agent installation. When the installer runs, it should detect an existing Agent installation and enter "Upgrade mode". The installer will then upgrade the Agent to its version.
Note: Remember, the QuerySurge Agent and the QuerySurge App Server must match in version. Otherwise, the Agent will not connect to the App Server. Therefore, be sure to upgrade your Agents with the same installer version as you use to upgrade your App Server.