AWS DocumentDB is a common constituent of many data architectures, ETL flows and Big Data implementations. If it is part of your architecture, you can test data between DocumentDB and other data stores using QuerySurge.
DocumentDB is deployed within an Amazon Virtual Private Cloud (Amazon VPC), and accessed via an AWS EC2 instance. For connections originating outside a VPC, SSH tunneling (also known as port forwarding) is used to access DocumentDB via an EC2 instance. Since most QuerySurge connections originate outside of the VPC environment, it is likely that you will need to set up a tunnel on each QuerySurge Agent box that will be issuing queries to DocumentDB. There are a number of ways to set up a tunnel:
- Internal Tunnel - AWS DocumentDB JDBC driver creates and manages its own internal tunnel
- External Tunnel (Option 1) - A tunnel external to the JDBC driver using a tool like PuTTY (Windows), which you can set up and manage
- External Tunnel (Option 2) - A tunnel external to the JDBC driver using a command-line SSH tool (Windows, Linux), which you can set up and manage
In the following article, we illustrate the setup of an Internal Tunnel and an External Tunnel with PuTTY.
Get the DocumentDB JDBC Driver
You can download the current DocumentDB JDBC driver version from this link. The driver should be placed in the /../QuerySurge/agent/jdbc directory of each Agent that you need to connect from. For Agents on Windows, follow these instructions. For Agents on Linux, follow these instructions.
Preliminaries for a DocumentDB JDBC Connection
To create a DocumentDB Connection in QuerySurge, use the Connection Extensibility feature of the QuerySurge Connection Wizard. Key pieces of information that you'll need for your connection include:
- DocumentDB Hostname (docdb-xxx-ec2.cluster-xxx.docdb.amazonaws.com)
- DocumentDB Port: 27017 (default port)
- DocumentDB Database: testdb (we use this for illustration; your database name may differ)
- EC2 Hostname: ec2-xxx.amazonaws.com
- SSH Username: ec2-user (this username is preconfigured)
- SSH Private Key File: DocumentDBKeyPair.pem (we use this for illustration; your file name may differ)
In the following sections, we illustrate the various options for setting up SSH tunnels, along with the Connection configuration in QuerySurge. In general, unless there is a reason not to use the built-in, internal AWS JDBC driver tunnel, we suggest that you do so, since it requires little user intervention once it is set up.
Internal Tunnel to DocumentDB
Notes
- This setup only needs to be performed once on each Agent. The SSH tunnel is managed automatically by the JDBC driver whenever a query is executed
- For all Agents in your QuerySurge environment to use this connection, you'll need to copy the original SSH Private Key and known_hosts files to the appropriate directory on each Agent
Steps
- Copy your SSH Private Key File to your Agent’s jdbc directory
For a Windows Agent: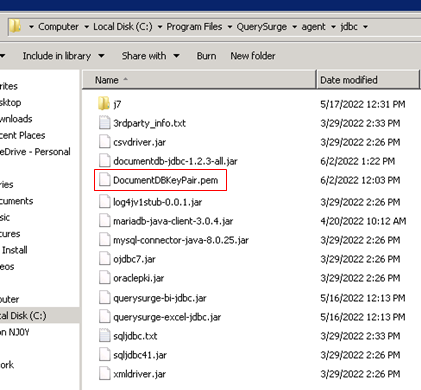
For a Linux Agent:
- Add the EC2 host entry to the known_hosts file
For a Windows Agent:
From a Linux environment, SSH into your EC2 instance using the following command
ssh -i <your private key> <your EC2 hostname>
This will generate a new fingerprint entry in your known_hosts file. Open this file with the following command:
vi ~/.ssh/known_hosts
and copy the host entry for the EC2 instance:
Create new file named “known_hosts” on your QuerySurge Agent in the Agent directory (for example: C:\Program Files\QuerySurge\agent\known_hosts)
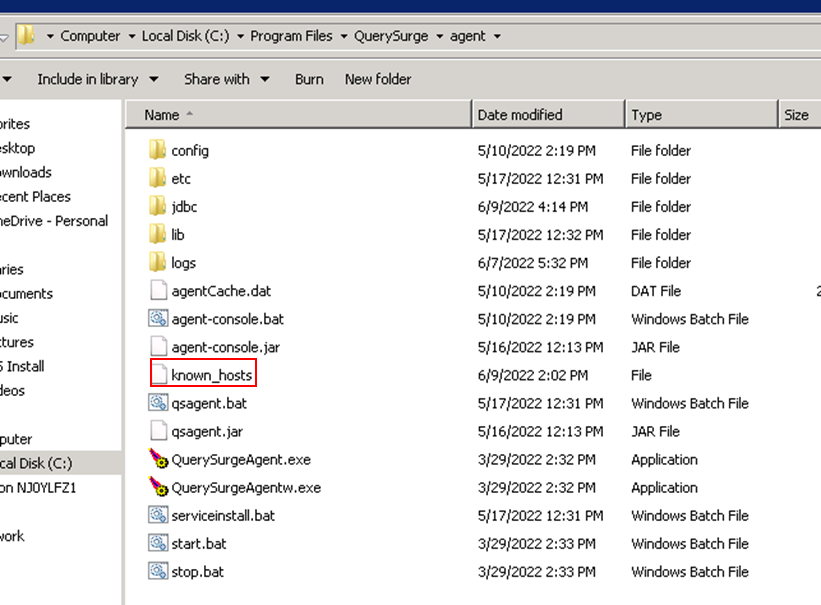
Open the new “known_hosts” file in a text editor and paste the copied text (from the Linux environment) and save the changes.
For a Linux Agent:
From a shell, SSH into your EC2 instance using the following command
ssh -i <your private key> <your EC2 hostname>
This will generate a new fingerprint entry in your known_hosts file, located at:
~/.ssh/known_hosts Note: This step can be skipped by adding the sshStrictHostKeyChecking=false key/value pair to the connection URL. However, this will create a less secure connection as the target SSH server will not be validated against the values in the known_hosts file.
 - Log into your QuerySurge project as a QuerySurge Admin user. Navigate to the Admin view and create a new Connection. As noted above, we use the Connection Extensibility option in the Connection Wizard.
The Driver Class: software.amazon.documentdb.jdbc.DocumentDbDriver
The Connection URL: Use the following format for the JDBC Connection URL in the QuerySurge connection:
jdbc:documentdb://<documentDB hostname>:<documentdb Port>/<database>?tlsAllowInvalidHostnames=true&sshPrivateKeyFile=<documentDB Key Pair>&sshUser=<EC2 username>&sshHost=<EC2 hostname>&sshKnownHostsFile=<known_hosts file location>
For a Windows Agent
jdbc:documentdb:// docdb-xxx-ec2.cluster-xxx.docdb.amazonaws.com:27017/testdb?tlsAllowInvalidHostnames=true&sshPrivateKeyFile=DocumentDBKeyPair.pem&sshUser=ec2-user&sshHost= ec2-xxx.amazonaws.com &sshKnownHostsFile=known_hosts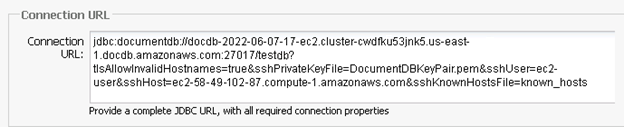
For a Linux Agent
jdbc:documentdb://docdb-xxx-ec2.cluster-xxx.docdb.amazonaws.com:27017/testdb?tlsAllowInvalidHostnames=true&sshPrivateKeyFile=DocumentDBKeyPair.pem&sshUser=ec2-user&sshHost= ec2-xxx.amazonaws.com &sshKnownHostsFile=~/.ssh/known_hosts
- Enter your Document DB credentials

You should now save this connection for use in a QueryPair.
External Tunnel to DocumentDB (Option 1) with PuTTY
Notes
- Recall that all SSH tunnel management is manual with this setup
- Each time the SSH tunnel (PuTTY) is closed, you will have to re-establish that connection using PuTTY (step #12)
- To allow all Agents in your QuerySurge environment to use this connection, you will have to perform these steps on each Agent (you can reuse the same Private Key - .ppk - file; this eliminates the need to run steps #2, #3 and #4 for each Agent subsequent to the first)
- Your SSH tunnel requires a local Port number (local to your Agent), which can be any port that is not in use. In the following example, we use 27117.
Steps
- Download PuTTY - https://putty.org/
- Download PuTTYgen - https://www.puttygen.com/
- Open PuTTYgen and click Load to load your SSH Private Key File
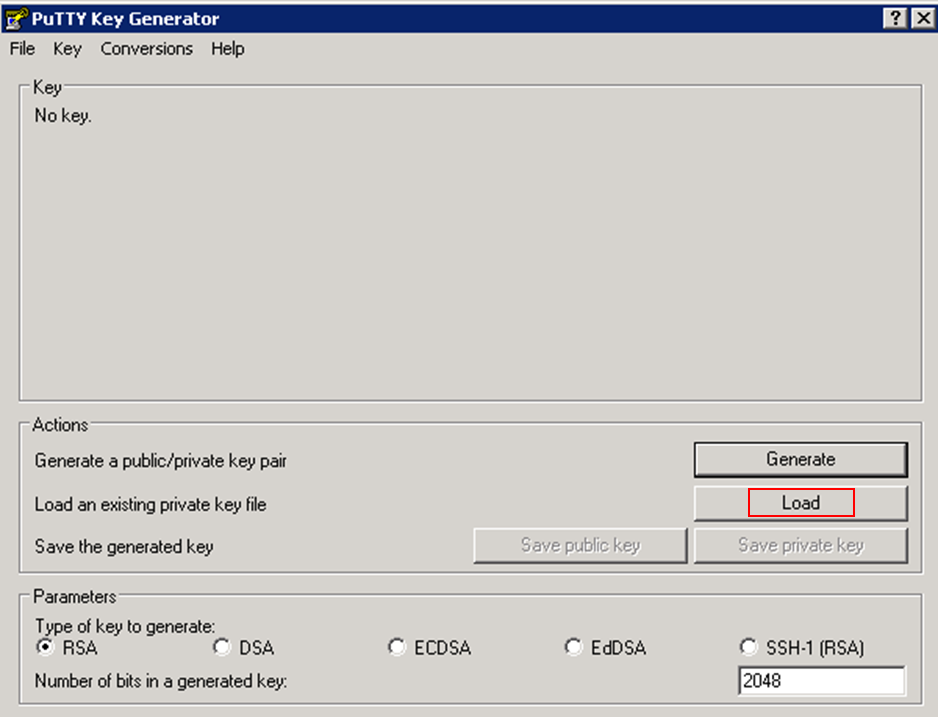
In the lower right, use the dropdown to show All Files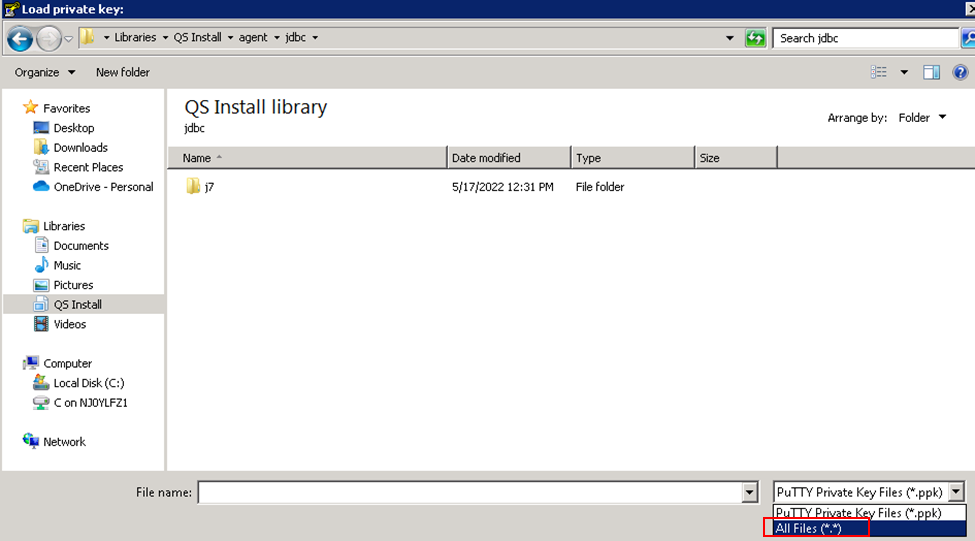
Select the .pem file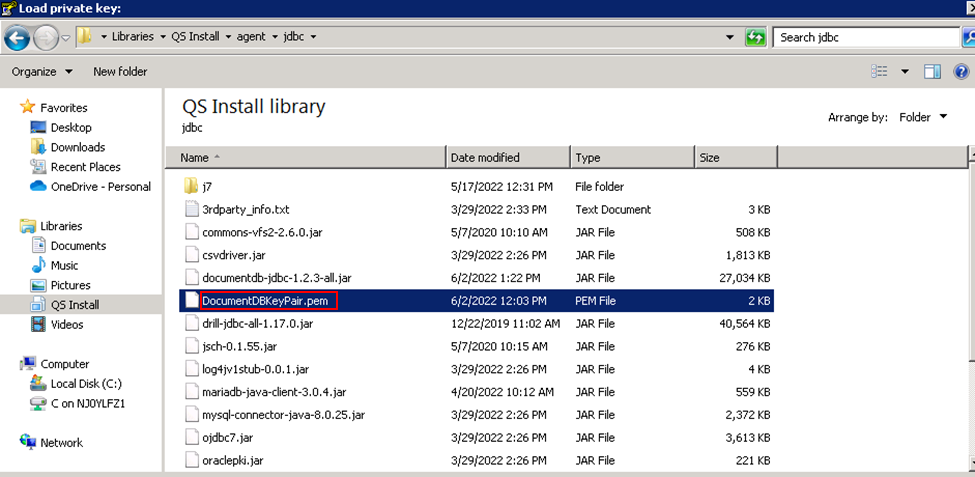
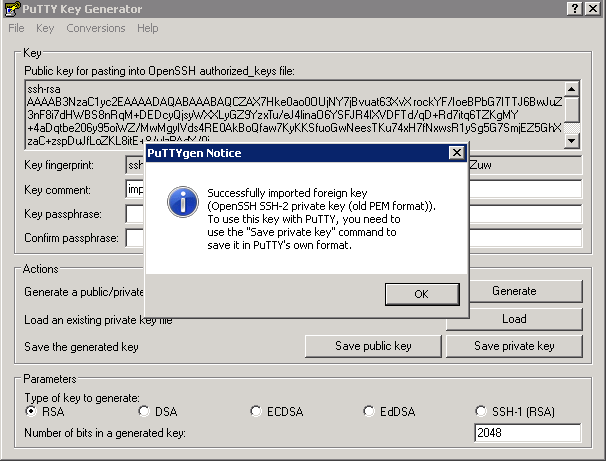
- Click OK to dismiss the notice.
Click the Save private key button to save the private key in a format PuTTY can understand (.ppk file). There is an option to assign a passphrase to the Private key. It is a good idea to assign a passphrase as it enhances security, but this is not required. If a passphrase is applied, you will be prompted for it when establishing an SSH tunnel.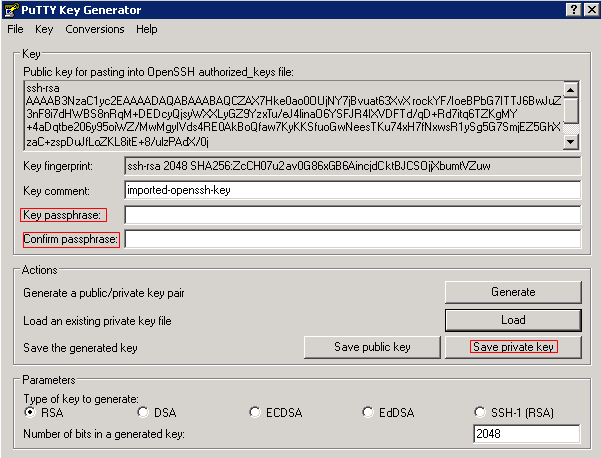 Save the new .ppk file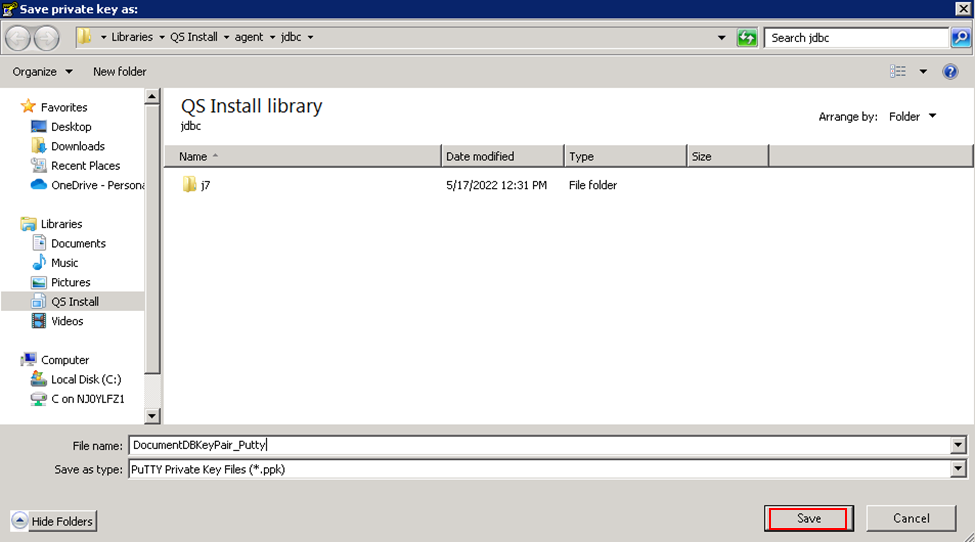
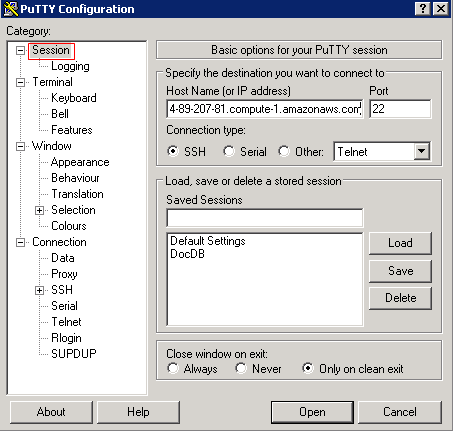
- Open PuTTY. Under the Session category, enter the hostname or IP address of the EC2 instance
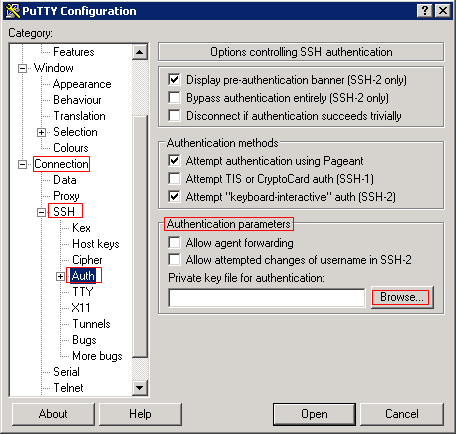
- Expand the SSH option under the Connection category, select Auth and Click the Browse button in the Authentication parameters section
- Select the Private Key file (.ppk) that you saved in step #4
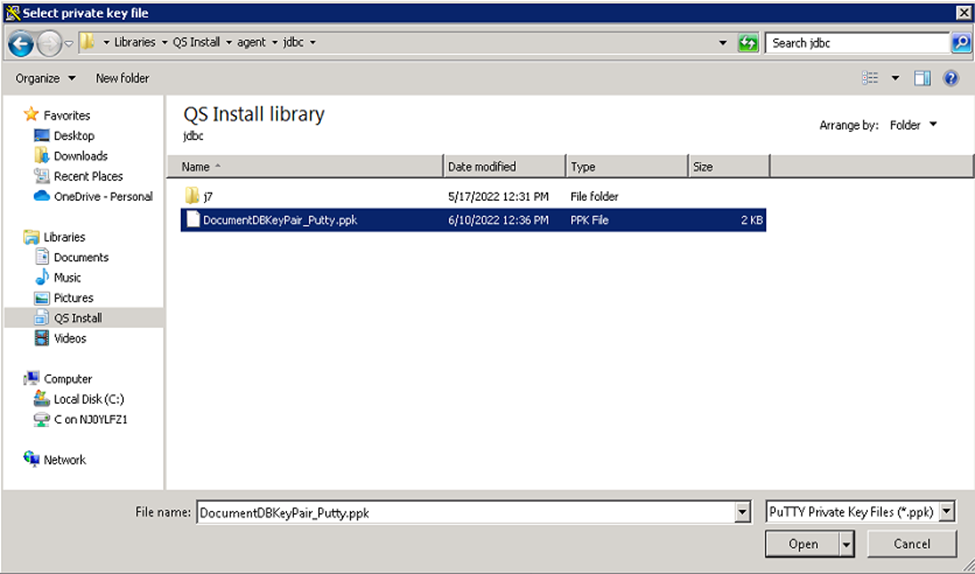
The path to your .ppk file will appear in the PuTTY window: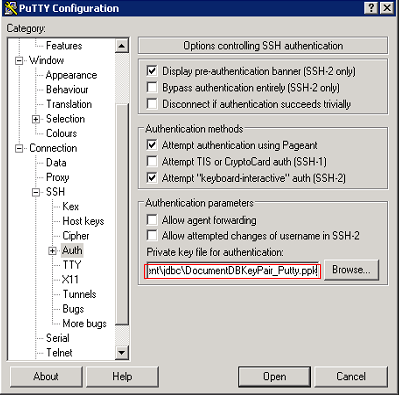
- Select Tunnels under the Connection > SSH option
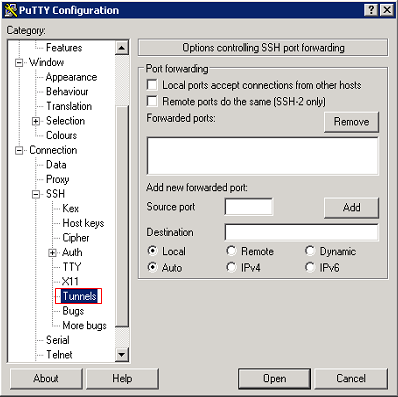
- In Source port field, enter an available TCP port number on your QuerySurge Agent machine (we use 27117 here). Also, in the Destination field, enter your DocumentDB hostname and port number in the following format: <DocumentDB_hostname/IP>:<DocumentDB_port>. For example: docdb-xxx-ec2.cluster-xxx.docdb.amazonaws.com:27017
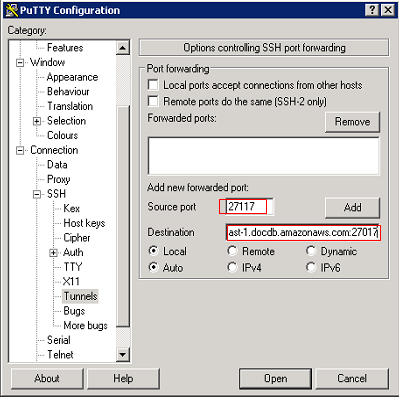
- Click the Add button and the new configuration will be added to the Forwarded ports field.
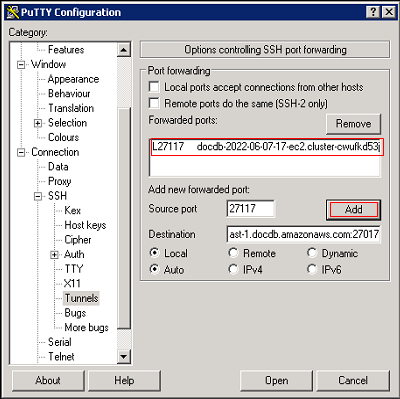
- Navigate back to the Session category, enter a session name into the Saved Sessions field and click the Save button.
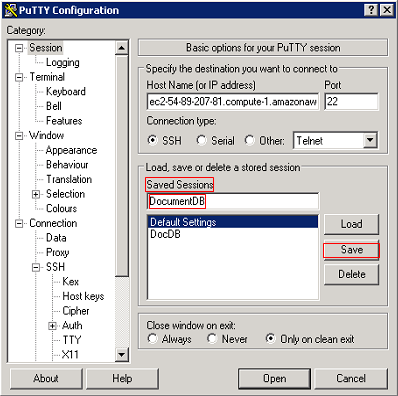
Your new Session now shows in the Saved Session option box: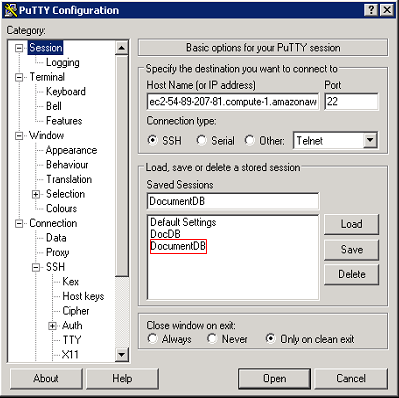
- Click the Open button and enter your EC2 username. If you chose to assign a passphrase to your Private Key in step #4 then you will also be prompted for it after your username has been submitted.

This login establishes the SSH tunnel, and the tunnel should remain in place until you log out. You do not need to do anything in the PuTTY window, other than leave it open.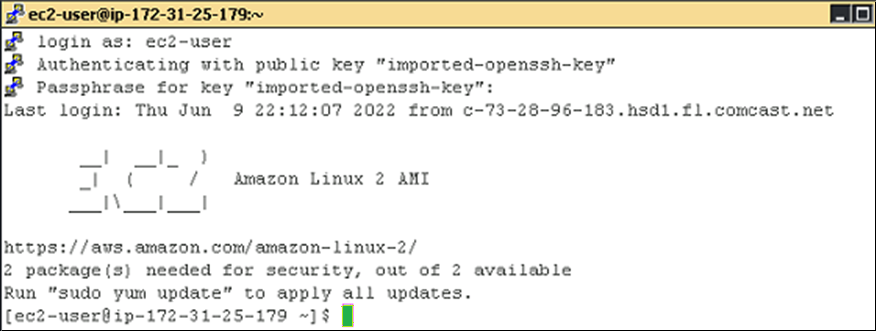
- Log into your QuerySurge project as a QuerySurge Admin user. Navigate to the Admin view and create a new Connection. As noted above, we use the Connection Extensibility option in the Connection Wizard.
The Driver Class: software.amazon.documentdb.jdbc.DocumentDbDriver
The Connection URL: Use the following format for the JDBC Connection URL in the QuerySurge connection. Note that the port from step #9 (27117) is used in the URL:
jdbc:documentdb://localhost:21117/testdb?tlsAllowInvalidHostnames=true
Enter your DocumentDB credentials:
Click on the Save button to save this Connection. You're ready to use it in a QueryPair.
External Tunnel to DocumentDB (Option 2)
On Windows 10, Windows Server 2019 and supported Linux Operating Systems, an SSH client is installed by default. This can be used to set up the SSH tunnel for the DocumentDB JDBC driver.
Notes
- Recall that all SSH tunnel management is manual with this setup
- Each time the SSH tunnel is closed, you will have to re-establish that connection manually
- To allow all Agents in your QuerySurge environment to use this connection, you will have to establish the SSH tunnel on each Agent prior to querying DocumentDB.
- Your SSH tunnel requires a local Port number (local to your Agent), which can be any port that is not in use.. In the following example, we use 27117.
Steps
- Build out the command line to establish the SSH tunnel. The template for the command is:
ssh -i <myprivatekey.pem> -N -L <local port>:<documentDB hostname>:<documentDB port> <EC2 username>@<EC2 hostname/IP>
A full command line looks like the following:
ssh -i DocumentDBKeyPair.pem -N -L 27117:docdb-2022-06-07-17-ec2.cluster-cwukfd32jnj8.us-east-1.docdb.amazonaws.com:27017 ec2-user@ec2-54-227-193-19.com.compute-1.amazonaws.com - Launch a command line window on your QuerySurge Agent box, and issue the command to establish an SSH tunnel.Note: You may need elevated permissions to issue this command.Note: The command as written above assumes you are executing from the directory where your .pem file is stored. If you can't execute from this directory, you'll need to modify the command for the full path to the .pem file.Note: If your .pem file does not have proper permissions, you'll receive and error. You'll need to modify the file permissions as indicated. This change will most likely require elevated user permissions.
- Log into your QuerySurge project as a QuerySurge Admin user. Navigate to the Admin view and create a new Connection. As noted above, we use the Connection Extensibility option in the Connection Wizard.
The Driver Class: software.amazon.documentdb.jdbc.DocumentDbDriver
The Connection URL: Use the following format for the JDBC Connection URL in the QuerySurge connection. Note that the port from step #9 (27117) is used in the URL:
jdbc:documentdb://localhost:21117/testdb?tlsAllowInvalidHostnames=true
Enter your DocumentDB credentials:
Click on the Save button to save this Connection. You're ready to use it in a QueryPair.